PAGES

Jesse Has Gone Rogue!

24 November 2013

Remember when Jesse said "we'll work on one room at a time"? Well, I guess he has decided that his involvement in the spare bedroom is done. Therefore, he has started work on our chain cabinet.... and... I am not complaining!

You may have seen this Pinterest Ikea Hack floating around:


When we where deciding if we where going purchase this house, we had stumbled across this pin and really loved their results. We where inspired to try to recreate the "hack". For the most part Jesse has been following the instructions posted on their website.

Click here for the original Ikea Hack inspiration instructions and blog post! 

Here is his progress:
Original Ikea Hemnes Cabinets. FYI - Ikea recently changed the design on this style of cabinet, therefore we where able to pick up this model in their last chance sale. 

The cabinets where too long for the wall. 

Therefore, our solution was to build out the wall. 

Molding started

Molding and lattice pieces up! 

x, Shan
Follow us on Pinterest
Jes + Shan

Project: Spare Bedroom Update

Now that the dresser is stained an new hardware has been added, I think I need a chance to review what I have left for this project.

Here is where we stand:
Walls painted
Dresser stained and new hardware added
Additional bedding purchased
Storage purchased for the top of the closets
I found a home for a hand-me down end table and Jesse's Cigars
I also found a new home for our old powder room mirror

New bedding & more colors! 
Hand-me down end table, cigars and a reused mirror.
Here is what I want to accomplish to complete the room:

I want a lamp for on top of the dresser - I am seeing lots that will work, however nothing I'm in love with. Which means I am probably being way too pick and driving Jesse insane.

With the hand-me down end table and the reused mirror, I would will to refinish the items to help blend in to the over all "design" of the room. They are standing out like sore thumbs.... right?

I want to figure out a cheap solution for new frames for the landscaping art pieces.

After those three projects have been completed, then we are 90% done! I would like to install an Elfa closet solution and change out the main light fixture to a ceiling fan. However, those are expensive projects that can wait a year or two.

x, Shan
Follow us on Pinterest
Jes + Shan

Hand-me Down Dresser, Part 2

23 November 2013

Well after a very long week, the dresser is finally done! Here are the results:


For the record, staining on carpet is not a good idea. You will most likely end up with a large stain if you do not put down cardboard or a outdoor tarp. However, thank God for Google & WD-40.... due to a panic stricken Internet search, I found that WD-40 will help lift the stain.

                     
                                      Before - WTF!
 After - What!?!


x, Shan
Follow us on Pinterest
Jes + Shan

Hand-me Down Dresser, Part 1

17 November 2013

Continuing with the spare bedroom makeover, my parents donated a dresser to the cause. It's in ok condition; the color is a little dated and it's missing a few hardware pieces.

After a complete inspection, we notice it wasn't solid wood. There was a fiberglass material for the drawer fronts. After some research, I found Minawax manufactured a gel stain that works on fiberglass and other non-wood surfaces. Great - time to goes to Lowes!!

Ahhh... It looks like Lowes no longer wants to carry the product. The only cans I found where on clearance and in a blond color. In a bit of a pinch, I start looking at the Minwax PloyShades. It's stain and polyurethane all in one step. I figured I would go home an try it out... my alternative is to paint!

Before staining completely 
Drawer front detail with one coat of stain
The Minwax PloyShades proved to be successful, therefore I continued to stain the whole dresser in the Bombay Mahogany color. I would recommend that you follow the manufactures directions and paint at least two coats. Trust you'll think one coat looks great - but two looks event better!

The final outcome.... well, I'll save that for tomorrow!

x, Shan
Follow us on Pinterest

Project: Spare Bedroom

10 November 2013

While my head has been in the living room, I quickly realized that we need to get our spare bedroom ready in time for the holidays!

Progress has started on the gallery wall in the living room. Meaning, I've mapped out where the art will actually sit on the wall and that's really about it...


Since I constantly have Jesse's nagging voice saying "one room at a time...". I would like to introduce the official project of the moment - the spare bedroom, aka the room full of hand-me downs. I should not need too much to whip this room in to shape. Plus, I'll get the added bonus of feeling good about completing another project.

I have decided the colors that seller used... Um, had to go! It's the bedroom that gets the most light and it felt gloomy. We choose to use Benjamin Moore Lancaster Whitewash on the walls and White Dove for the trim. To add a nice visual contrast, I decide to paint one wall Benjamin Moore Hale Navy.


The bed was a hand-me down from a downsized company apartment (very like new condition!!!). The coverlet was a something I had purchased in hopes of changing up our bedding, but never got around to changing. The art was created by Jesse's grandmother, just need to find a cheap fix to those frames.

Right now we are off to a good start with the basics... Just need to add some character! Oh, and paint above the closets!


x, Shan
Follow us on Pinterest

Drop Off Zone

02 November 2013

While I was contemplating the gallery wall for the living room, I also started conceptualizing a drop off zone next to our front door. We really have simple needs for this area, however I have a pretty complex design idea. I can just envision Jesse now complaining why I have to make everything overly complicated.

Our needs consist of hooks for coats and a small shelf to place keys and phones. When I draw it out of paper it looks pretty straight forward... 


To add additional texture, pattern, and visual interest to the room, I want to create a herringbone white washed wood wall. Once again I created a semi-scaled mock up of my "vision" to walk Jesse through my though process.


Jesse will love the plaid coat :)

x, Shan
Follow us on Pinterest
Jes + Shan

Gallery Wall Concept

24 October 2013

Oh I love Etsy & Pinterest... With all these discounted, one day sale, e-commerce stores popping up (Fab, Joss & Main, Gilt, etc...) I almost forgot about my love for Etsy. Since I decided to start on this "gallery" wall for the living room, I thought it was the perfect opportunity for me to revisit my old sweetheart, Etsy.

Coming up with a theme was easy. Since Jes & I have decided to create a home of... stuff we love + cabin wishes + urban pioneer realities. I thought why not have all that (whatever "that" really is) summed up in this gallery wall.

Since Pinterest has really become the home decor encyclopedia, I will allow you to search though thousands of inspiration pictures and how-to guides regarding gallery walls. You'll note that there are not any rules when it comes to creating one of these. You can have what I call the "Type A" or the "Type B" looks. Since our old apartment had a collection of black and white photos gathered in to a very straight rectangle (*cough*... very Type A), I figured would do something a little bit different.

I searched Etsy up and down using keywords like, philadelphia, cabin, hipster, rural, etc... and came up with a TON of stuff. While I would love to purchase everything and see how this puzzle of the gallery wall fits together - I can't do that without going broke! Since I am starting from scratch with this collection, I needed a way to plan my Etsy purchases. Therefore, I decided to use MS Powerpoint (Side note: I would love Illustrator and Photoshop, but for my truly basic needs I can make powerpoint work). 

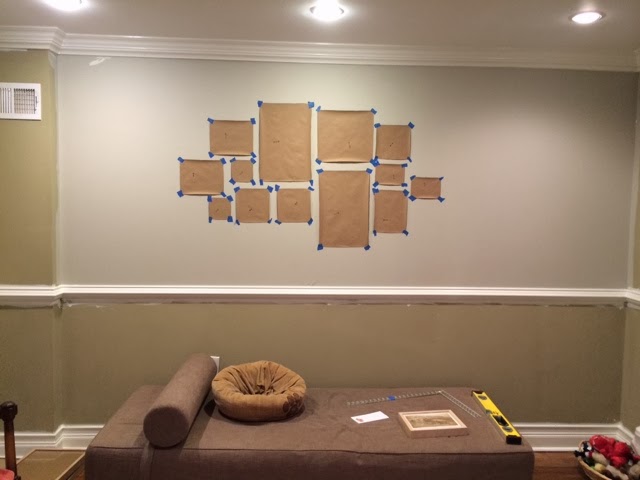
I measured out a space where the gallery wall would go, created a scale, and then adjust the page size of the powerpoint slide. Using screenshots of all the art images, I sized down to scale and placed the item in powerpoint. This is where I ran in to my first road block. I had a hard time figuring out where to start in this collection. Therefore I allowed my obsessive tendencies kick in... I drew in lines to mark the center and then created a center oval to "direct" the collection shape. By using this technique I helped create a sense of balance with in the collection... well, I hope I did. Once I had the frame work completed, I was able to picked and plop items until I was happy with the collection.


This gallery wall was created with art from my personal collection & Etsy Sellers: MetalMelersllc, joystclaire, BrandiFitzgerald, LisaRussoFineArt, allsonostertag, embiscuitpics. Click here for listings.

Now how do I sell this collection (and expense) to Jesse...

By showing him the whole picture!


I still laugh at my so-called scaled creations on powerpoint! LOL! They work and they help me explain my "internal thought process" to Jesse.

x, Shan
Follow us on Pinterest
Jes + Shan

Where to go now?

20 October 2013

"Wouldn't this look great here?"
"Oh, what are your thoughts on this!?!" 
"Oohh it's soo soft!" 

I am completely struggling with this whole "finish one room at a time" mandate Jesse has dictated. I see the logic behind his reasoning. It's just a bit painful because we are not moving as fast as my brain comes up with concepts. 

We are still working on the painting on the first floor. Here is our current progress...


The doors and trim in the dining room (Jes is currently painting the living room) have been painted using Benjamin Moore White Dove. About half of the walls above the chair rail have been painted Benjamin Moore Revere Pewter. The wall space below the chair rail will be another awesome Cole & Son wallpaper.

I think I need to focus on a "small" task that helps me feel like we are making progress. Therefore, I have decided to embark on creating a "gallery" wall in the living room. Our old apartment had a collection of black and white photos, however I'm feeling the need for something different. Something that combines everything that we find completely awesome.... well... really... what I find completely awesome. 

x, Shan

Follow us on Pinterest


Project: Powder Room

19 October 2013

Finally, I am throwing in the towel! The powder room is done (well, for now)!

Some people are born with a fantastic skill set that allows them to create wonderful things... Our skill set doesn't include carpentry. While YouTube and HGTV makes everything look easy and fantastic. I have to keep in mind they are professionals and this is not my day job. Overall, I love the concept of our powder room. It's when you start looking at the fine details and you can see our blunders. As I stated, we are not professionals and we are learning as we go... You have to crawl before you walk, right?


I've omitted the picture of me in my sweatpants.... you'll thank me later! The wallpaper makes me giggle with delight every time I see it! It's from Cole & Son, the Fornasetti II Collection, Teatro 97/14043.

x, Shan
Follow us on Pinterest
Jes + Shan


Making some progress

12 October 2013

I think we are trying to do too much. Every time I turn around, there is something that we need to accomplish. O'well, it will all be done in time... right!?!

Last weekend, we managed to fix the damage we created in the basement and fix a mouse hole in the kitchen.

If you remember, we took out a large section of the wall in the basement to maneuver our washer and dryer downstairs. Rather than building the wall exactly as it was, we decided to cap off the hole. Just in case we have more items we need to move down to the basement. Did I mention I need a new couch down there!?!

Here is the unfinished outcome:


We still have to: pick a paint color, fill in the top gap with plaster, and fix the stairs.

However we have also discovered a mouse issue... um... yuck!

Look, I live in an urban environment and mice happen. That doesn't mean I have to like it! I found a mouse snooping through my fancy simple human trash can, yep he crawled right up in there! Therefore we had to take immediate action. I'm sorry, but when you lift lid of your trash can and there is a pair of eyes staring back at you... I'm not sure about you, but my first reaction was to scream. Our dog ran upstairs and hid under the bed. Once I calmed down, we started a mouse hole hunting mission.

Since we purchased a brand new rehab, at the time of our sale, we didn't think to check behind appliances for holes. However, our prior apartment living experience has trained us to always look behind the stove, dishwasher, and fridge for mouse holes! Sure enough, we found them.

We discovered exposed outlets behind our stove (not good) and a giant hole behind the dishwasher. It looks like the contractor accidentally damaged the drywall and didn't fix it because they knew a dishwasher was going to block it.

Lesson learned - check behind the appliances in your home inspection.

x, Shan
Follow us on Pinterest
Jes & Shan

Hello... again!

28 September 2013

Summer is officially over... and now we really have to start thinking about all those projects that we haven't completed!  That's right, not only was I not updating the blog... I was not accomplishing any home improvement tasks.

Nada, Zilch, Zip, Zero.... bloody sod all NOTHING!

Summer is the the perfect time to go outdoors, hang out with old friends, and take day trips. Needing a recharge from all the "weekend" projects... we stopped all working on the house. Winters in Philly can be miserable, a least for someone who hates to be cold, therefore since I have no choice but to stay indoors... why not paint in the Fall/Winter and have fun in the Summer while it's here!

Therefore, we are back at the drawing board... structuring our to-do lists (hopefully with realistic timelines) and I'll be blogging once more.

Til next time!
x, Shan
Follow us on Pinterest
Jes & Shan

Staying Out of the Way

15 July 2013

Jes and I decided to go our separate ways on the projects. While he's is finishing up the powder room, I had to look for new tasks. The next logical step was to start working on the dinning room, since this is the next project on the list.

The main floor of our house is a fairly open concept, therefore we had to come up with our overall design objective for the floor before I can pick a paint color for the dining room. We decided since we both like being in the mountain and the city, why not combine those to thoughts for an "urban cabin" feel. Since we have the chair rail through out the main floor, I decide we would wallpaper the bottom half in Cole & Son's Woods Wallpaper in a gray finish. The top of the chair rail will be Benjamin Moore's Revere Pewter. 

I started painting above the chair rail & I'm really happy with the color! At the same time, I found the perfect home for the candle holder the prior owner had left behind for us!


The dining room has a lot of little "weekend" projects, here is what we have to do: 
(1.) Hack the Ikea Hemmes Cabinets (Pinterest inspired project) 
(2.) Extend the wall under the stairs so it can accommodate the Ikea Hack. 
(3.) Remove the archway between the living room and dining to make even more open
(4.) Add a decorative backing to the current Ikea Norden cabinet
(5.) Wallpaper below chair rail
(6.) Paint ceiling
(7.) Pick a trim paint & paint trim and doors

Since we are cutting out the drywall and extending an area, I've painted all the Revere Pewter I could without moving the bar cabinet. Therefore I needed to look for additional work.

In the meantime, I found a home for Jesse's Grandmothers art in the spare bedroom and came across a chair left out for trash!


x, Shan
Follow us on Pinterest

Weekend Warriors... I think not!

13 July 2013

It's been nearly one month since my last post.... By now I had hoped to shared my completely finished powder room and tell you all about my next great project. However, I've come to realization that  HGTV "lies" to you. Projects take MORE than a weekend or three days when you are not professionals. Home projects are not easy, despite what is shown on tv.

I've also come to the conclusion that Jesse is not quite as clam and collected as he seemed before we purchased the house. We learned that he is not the skilled laborer he thought he was... He really just likes buying and playing with power tools. One day he'll figure it out... At least lets hope! 

So what have we done since my last post? We managed to hang the wallpaper in the powder room. It's not entirely straight, but after all the heart, sweat, tears and words we had over this paper... It's staying bloody up! Lesson learned, Jes and I can not work on wallpapering as a team. I am too much of a perfectionist in aligning patterns. We also started in the wainscoting in the powder room. This is where we learned we shouldn't let "ego" get in the way of a project and that it's smart research project before starting. With how many smart devices we have in the house, it doesn't help if we don't use them. 

In frustration with the wainscoting, Jes & I needed to take on different projects. Working together is not as fun or joyful "as seen on tv". Therefore, I jumped a head to the next logical project.

Current status of the powder room:


Items left to do:
(1.) Finish wainscoting/trim work
(2.) Fix oddly cut crown molding
(3.) Chalk seams
(4.) Paint
(5.) Hang toilet paper holder


x, Shan
Follow us on Pinterest
Jes & Shan

Project: Powder Room

18 June 2013

I have been dying to start this project, it would have done the first if we didn't have a need for a luandry room. One thing you have to understand about me is that I LOVE bold prints. I'm not sure why, but the little crazier the better.

When I was thinking about what to do with our powder room my mind went towards wallpaper! So I headed over to my favorite wallpaper manufacture, Cole & Sons. They put together some of the worlds best prints. It's a heavy price tag, however when you consider that they are still hand produced you can justify the extra dollars. At least that was my logic when I told Jes how much two rolls of paper.

From the Fornasetti II Collection, I went with Teatro 97/14043.
Picture Credit - Company Website

It might be a litte creepy for the powder room; all these theater goers watching you use "the loo".  However, I think that's why I love it - it's just very unexpected!


x, Shan
Follow us on Pinterest
Jes & Shan

Side Projects

17 June 2013

Remember Jesse told me I could only have one project going on at a time.... Well, he fully supported these side purchases.

Left - New dining room rug

Right - New container garden set-up for the front of the house (This of course meant we had to purchase a hose, a hose holder & spray nozzle - which Jes justified that he'll now be able to wash the car on the street. LOL!)

x, Shan
Follow us on Pinterest
Jes & Shan

90% Complete!

16 June 2013

I feel that this laundry room project lasted forever! Stuff that I had planned on reusing ended up not working, therefore new solutions needed to be found. In the meantime, we ended up getting side tracked with my need for a container garden and Jes' need for new power tools.

My part of the project is completed - Well, I have to clean up some old paint and drywall mud of the pipes. Also, figure out a solution for the drainage hoses. Jes owes the project a countertop that will sit over the washer and dryer. However - I'm done at 90% complete.

Before Pictures:


After pictures:
First off let me apologize for the quality of the photos, I'm using my iPhone with a wide angle lens attachment from photojojo. If you look closely you can see the dent marks on my dryer from when Jes & I tried to move the dryer downstairs by ourselves. For now, I can live without a countertop over the appliances. Once it's installed it will provide a nice clean line and countertop space for folding (ha!). I was able to find a drying rack that folds up in to itself at the Container Store (seriously, the best store EVER!). Hopefully, with the installation of this small gadget we can stop using our dinning room chairs as drying racks.

From the Container Store, I also found a great utility hook for brooms & mops. I was also able to reuse our old Ikea Kitchen items here for additional utility needs. The prior owner didn't consider a drainage for the washer machine, hence the big ugly black hose. We'll need to do something with this.... but what I have zero idea. There is also another smaller drainage hose, that we need to secure to the wall and paint over.

We had to install shelves to store cleaning supplies and stuff... nothing special ... but we did manage to paint behind the appliances! It's done rather poorly, but it's better than looking at untouched drywall. The paint color is Betsy Ross Hose Moss by Valspar, available at Lowes.

Products used:


 x, Shan
Follow us on Pinterest
Jes & Shan

Progress

31 May 2013

I have to admit, I am totally sick of the Laundry Room. I think I was ready to throw in the towel once the washer and dryer where installed. However I had started to paint, therefore I had to finish!

Memorial Day weekend would have been a good time to knock out this project, however we had better things to do that weekend!

This week, I have managed to finish almost all the painting. I have this tricky spot behind the water heater and HVAC unit. Overall I think I did well! The color is Valspar Betsy Ross House Moss in a Semi Gloss finish. I think the finish is a little too shinny for my taste, but I went off the recommendation of the Lowes employee.


What is left:

  1. I need to source new shelves. I was hoping to repurpose my Ikea Ivar Unit from the old apartment, however once we where able to put the appliances downstairs it be came apparent that the shelves did not fit. 
  2. I would like to add a countertop on top of the washer and dryer, so that I have a flat surface for a ironing board. Jes is already fighting me on this. Since the appliances are next to the HVAC, he'll need to access them if we ever have an issue. A countertop would only get in the way... I guess he has a point. 
  3. Clean up any drywall mud that is stuck to the utility sink, gas line, ducts and copper pipes. 
  4. Dust HVAC and water heater
  5. Accessorize! 

I would LOVE to get a new utility sink - found this one by Kohler. However it's not in the budget for this makeover. Maybe after we get the entire house sorted, I'll splurge for the sink. 


x, Shan
Follow us on Pinterest
Jes & Shan

Success

19 May 2013

I am beyond happy! The washer and dryer have made their way from my living room to my basement. Very special thanks to Jes, my brother (Luke) and my father! Now all I need to do is finish painting, organize, and get Lowes back out here to finish the install.

How did they do it.... Well, remember that hole - it got bigger!
Now, what should we do about that?


x, Shan
Follow us on Pinterest

Momentum is lost

11 May 2013

I have been struggling to find the momentum to finish unpacking. It makes me think...

  • Do I really need what is inside those boxes? 
  • Have I missed not having those items out? 
  • Would I need to re-buy anything if I just donated the boxes without opening them? 
  • Do I even remember what is in the boxes?? Probably.... um, not! 

Jes and I hit "a wall" with the whole washer and dryer not fitting in to the basement on the delivery day. Knowing that we where able to get the dryer halfway down the stairs, we decided returning the units where not an option. Therefore we turned to Angie's List to find some general contractors. We came up with the idea of completely remodling our basement steps, in the mist of the remodel we would bring down the washer and dryer.

  • Three out of the four contractors reached out after our initial email. 
  • Two contractors came out to officially quote the job. 
  • One contractor said it wasn't possible. 
  • The other gave us a $2,000 estimate, but hasn't responded to our follow up questions. 

Therefore, we are back to trying to do it ourselves... again. Jes is convinced that we can remove the section of the drywall back (you know the hole he has already created) and that would give enough  clearance for the machines. I have convinced Jes that we should paint the laundry room now before we can bring everything in.

While I wasn't looking to have the laundry room be our first project, out of necessity,  it's going to have to be.  Therefore, I have a new Pinterest board! I have to admit - I LOVE the big open laundry areas. However I need to find a tiny (very tiny) laundry solution! But, it's always good to look at everything for inspiration.


x, Shan
Follow us on Pinterest
Jes & Shan

Not so happy day.

05 May 2013

Ever since I moved out of my parents house at 19 years old, all I've ever wanted is my own washer and dryer. That's it! For the last ten years, I have been using common area apartment laundromats... It's was horrible. Hauling pounds of dirty laundry down to the scary basement, eight floors below, taking the nasty smelling fright elevator. Trying to avoid conversations with the crazy cat lady.

Finally, the day came where my Prince Charming purchased our very own washer and dryer. A shinny new white matching set. Best part, Lowes was ready to install next day. Complete bliss!

Jes swore up and down that he made all the measurements.... Well the installers came, looked at our stairs and said it wasn't going to fit. They made an attempt - it wasn't going to fit. So they dropped off the machines in the living room. Fail.

But it gets better.... Jes came home and insisted he and I could get the machines down the stairs. Not joking... Jes and I make an attempt to move the dryer downstairs. Jes measured everything but the distance between the ceiling and the steps. Turns out the machine is too tall to make down the stairs.

Great - we had the dryer half way down the steps. Then, all of a sudden Jes gets the idea that the dryer can fit if we knock down a section of the wall... Yep, the hammer came out...

Mid way through taking down the wall, Jes had a change of heart, and decided we needed to bring the dryer back to the living room. WTF!?!

So, now I'm left with a giant hole and a washer and dryer set waiting to be installed.


x, Shan
Follow us on Pinterest

It's all the little things

03 May 2013

Jes and I where lucky to find a recently re-modeled and flipped home that we agreed on; meaning we have very little initial work that needs to be done. We walked through a fair amount of homes looking for "our home". We saw gently loved and in-lived in homes, extremely outdated homes with LOTS of character, and re-modeled/shinny new homes.

Picking a home is really stressful - it's where you are going to live for the next five to seven years! Maybe even longer.... which might put some self-imposed pressure to make the "right" selection. Despite what they tell you, the process is NOT FUN. This is just my opinion... I would much rather negotiate the price on any house than go though the selection of the "right" house. Good thing I had Jesse; he was very vocal in what he wanted.

Once you make the selection, you start making the big project list. For us it's: (1) purchase a washer and dryer, (2) figure out how to get more square footage in the kitchen, and (3) create great curb appeal for the front of the house.

It's not until you have lived in a place for one day that you realize the little things that are missing... a mailbox, towel bars, and a toilet paper holder. It's the little things that take you to Lowes three days a week. It's not just buying the towel bar - it's buying the drill bit to make holes in tile, the right anchors for the bar, and some other little doodads that I can't explain their purpose.

This is where Jesse gets to show off his "handyman" skills. This is where I pour a glass of wine and crack-up over these "manly" attributes.  Jes has successfully installed our mailbox, two towel bars, and (with the help of my dad) changed our dining room light fixture.


The mailbox instructions listed four steps for installation -  Jes took about 35. Our bathroom fixtures are an ongoing "project", it's taken three days for the towel bars... and we still have a toilet paper holder to install. The light fixture was the easiest and was done within a few hours. All kidding aside, I am proud of Jes for tackling these tasks. He has never had to do anything like this before, he just needs to figure them out at his own pace.

x, Shan
Follow us on Pinterest
Jes & Shan

Moving is painful...

30 April 2013

I started this blog with every intention to post nearly every other day - maybe a bit ambitious, however I still thought it was attainable.

Until.... we actually had to move. It took us about a week to pack up our old apartment. It's amazing how much stuff one can accumulate by residing in the same place for six years! I don't remember moving taking this long when I was in college.

Mambo Movers came the Saturday after our settlement date. Simply amazing! In four hours they had moved us from our 6th floor apartment North of Center City to our little townhouse in South Philly. They had no problem moving our heavy boxes of books down to our finished basement... using the world most uneven and narrow stairs. If you live in the Philadelphia area, I highly recommend using them.


Finally, the moment we have been waiting for, we are officially moved in to the new house! Except we have to un-pack! Ugh, pour me a glass of wine... this is going to take forever.

x, Shan
Follow us on Pinterest
Jes & Shan

Settlement Tomorrow!

14 April 2013

To be honest, I didn't think we would get here... our last inspection resulted in an additional repair list for the seller and a credit request. Jes met with them during the week and everything seems to be on track. I guess we will know first thing Monday morning! Fingers crossed!
Until then.... we need to pack!

x, Shan
Follow us on Pinterest
Jes & Shan

Curb Appeal

12 April 2013

I love the fact that Spring is officially here! Mostly because people have started to place plants their window boxes. It just makes my walk to work so much more pleasant.

A co-worker passed along some friendly house hunting tips, the one that suck out in my mind was make sure you actually look down the street. Is trash being picked up? Are there over grown weeds in the sidewalk? Does the neighbors have holiday lights up in July? Do people have window boxes (preferably with real plants)?

I am not sure why all these items stuck out - but, they did. Our new neighborhood is a part of a new up and coming part of town, therefore it doesn't have some of the beautifully landscaped town homes like our current neighborhood. Therefore, in order to change this, I need to be a part of the change! They say you lead by example, right?

Jes has already made me promise:
(a) that I will only work on decorating one room at a time,
(b) I have to finish the room before moving on to the next space,
and (c) I have to take time/breaks between each project in order to replenish capital (meaning he doesn't want to go broke in the process!).

In the hopes of pursing Jes to want to paint the front door purple  I came up with this primitive drawing of the "goal" outcome of the front of the house.

I would love to see:
  • Windows and door get a thick white wood trim 
  • Black shutters and window flower boxes
  • A deep purple/aubergine front door
  • A great entry light sconce 
  • Some type of art (maybe stained glass) above the door

I think he'll be on board! This might have wait to be next Spring... but I'll be sure to blog about it once it happens! See the inspiration pins:


x, Shan
Follow us on Pinterest
Jes & Shan

Five Days Away

10 April 2013

This past Monday we had our final inspection with Pilar and Post. I have to admit walking through the house days before the settlement has me nervous, excited, and anxious.

The house is located in an area that is hoping for a turn around. While it's quite possible that it can happen, and if you listen to real estate blogs - it will happen. It's really a matter of time. This makes me nervous and anxious; I am not known for having a ton of patience.

The house is a perfect fit for a starter home. It's 1,100 square feet with two bedrooms and small back patio. The prior owner purchased the property to flip - so everything has been almost gutted and renewed. The basement is finished, the upstairs is carpeted, and the main bathroom is big!


Settlement is 5 days away! I can't wait to paint... hehe

x, Shan
Follow us on Pinterest
Jes & Shan

Pinterest

08 April 2013

Oh - I have a love & hate relationship with Pinterest. I love how it inspires me. I hate how I lose track of time while on Pinterest.

Jes & I decided that we would seriously consider buying a home this year  - seconds after the decision, I started pinning away! Looking for ideas for what we want in a home and, well mostly, how to decorate a home. Here is a hodgepodge of my favorite pins:


"Time you enjoy wasting, was not wasted."
- John Lennon

x, Shan
Follow us on Pinterest
Jes & Shan

Hello world!

06 April 2013

I'm back - officially this time. It's been a long time since I felt the desire to blog, however I have a new project in the works! Jesse and I are buying a home.

NOW... we have something to write about! So follow us and join in our adventures in decorating, our ups and downs, and watch as we *try* to keep it all together.

Settlement is nine days away - I can't wait to share.

x, Shan
Follow us on Pinterest
Jes & Shan
 

Blog Design by Nudge Media Design | Powered by Blogger